 Save to Pinterest
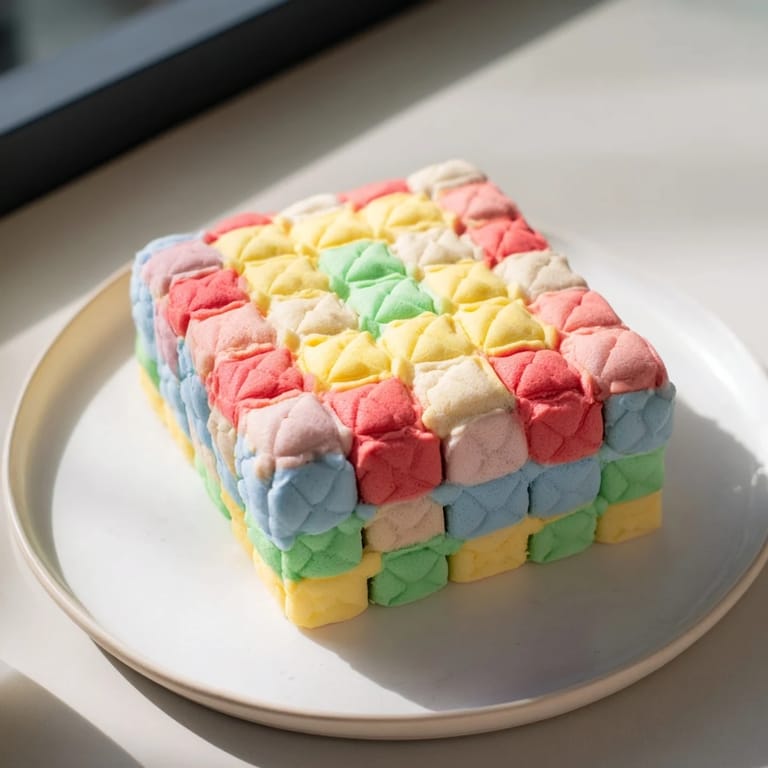
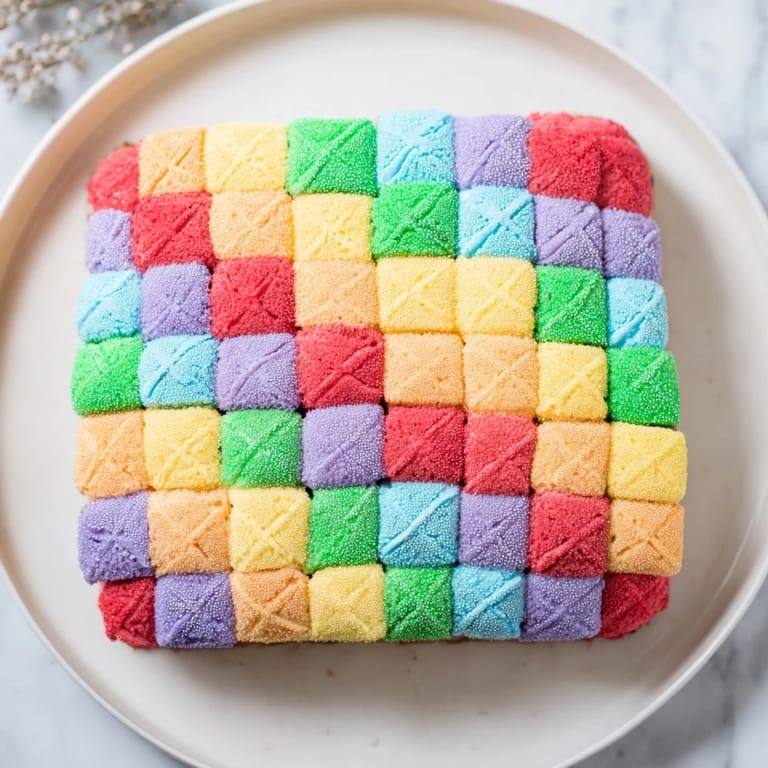
 I'll never forget the afternoon my grandmother pulled out her old quilting patterns and said, 'You know what would make a beautiful cake?' That simple question sparked something magical in my kitchen. The Cozy Quilt Patchwork Cake was born from the idea that desserts could be as visually stunning as the handmade quilts she treasured. Now, every time I bake this cake with its vibrant squares of color woven together, I feel like I'm honoring her creativity while creating something entirely my own. It's become the cake I reach for when I want to impress someone—not with complexity, but with pure joy on a plate.
The first time I served this cake at a dinner party, I watched my friends' faces light up when they saw those perfectly arranged colored squares. One guest asked if I'd studied cake design professionally. I just smiled, knowing that the magic wasn't in complexity—it was in taking time to understand how colors and flavors could tell a story together.
Ingredients
- All-purpose flour, 350 g: This is your foundation, and the amount is precisely calculated to give you that tender, delicate crumb that quilters would appreciate—not dense, not fluffy, but perfectly balanced
- Granulated sugar, 300 g: The sweetness should be noticeable but not overwhelming, letting the butter and vanilla shine through
- Baking powder, 2½ tsp: Don't skip the precision here—this gentle lift is what keeps each colored square light and airy
- Salt, ½ tsp: A pinch that might seem small, but it awakens every other flavor and prevents the sweetness from feeling flat
- Unsalted butter, 250 g (softened): Room temperature is non-negotiable; cold butter won't cream properly and your cake will suffer
- Large eggs, 4: These are your binding agent and they need to be at room temperature to incorporate smoothly
- Whole milk, 250 ml: This creates the tender crumb; whole milk's fat content matters more than you'd think
- Vanilla extract, 2 tsp: Use real vanilla—the difference between genuine and imitation is something your palate will detect instantly
- Food coloring gels (red, yellow, green, blue, purple): Gel colors are crucial; liquid food coloring will thin your batter and compromise the texture of each colored square
- Unsalted butter, 350 g (for frosting): Again, room temperature softness is the difference between buttercream that's silky or grainy
- Powdered sugar, 500 g: Sift this if you have lumps—nobody wants grittiness in their frosting
- Milk, 3–4 tbsp (for frosting): Add gradually; you're looking for that perfect spreadable consistency
- Vanilla extract, 2 tsp (for frosting): Match it to your cake for harmony
- Salt, pinch (for frosting): Just enough to round out the sweetness
Tired of Takeout? 🥡
Get 10 meals you can make faster than delivery arrives. Seriously.
One email. No spam. Unsubscribe anytime.
Instructions
- Prepare Your Pans and Oven:
- Set your oven to 180°C (350°F) and let it preheat while you prepare five square 20 x 20 cm pans. Grease each one generously with butter or oil, then line the bottoms with parchment paper—this small step means your beautiful colored cakes will release perfectly without sticking. If you don't have five pans, don't worry; you'll bake in batches, letting each set cool before baking the next.
- Create the Perfect Batter Base:
- In your largest mixing bowl, beat softened butter and sugar together for about 3 minutes. You're looking for that pale, fluffy texture that tells you air is being incorporated—this is where the lightness of your cake begins. Crack eggs in one at a time, beating for 30 seconds between each addition. This patience pays off; rushing means you won't get the smooth, creamy texture you need. Pour in vanilla extract and give it one final beat.
- Combine Dry and Wet Ingredients:
- In a separate bowl, whisk together flour, baking powder, and salt—this aeration of flour matters more than you'd think. Now comes the important part: alternate between adding the flour mixture and the milk to your butter mixture, starting and ending with flour. This means flour, then milk, then flour, and so on. Mix each addition until just barely combined; overmixing develops gluten and turns your cake tough. You're almost there.
- Divide and Color Your Batter:
- Pour your batter equally into five small bowls. Now for the magic: take your gel food coloring and add just a few drops to each bowl. Start with less color than you think you need—gel coloring is potent, and you can always add more. Stir gently until each bowl is a beautiful, even shade. This is where your patchwork cake begins to take shape in your mind.
- Bake Each Colored Layer:
- Pour each colored batter into its prepared pan, spreading it smooth with a spatula. Slide into your preheated oven and bake for 20–25 minutes. You'll know it's done when a toothpick inserted in the center comes out clean or with just a few moist crumbs. Let each cake rest in its pan for 10 minutes—this resting period is when the structure sets properly. Then turn out onto a cooling rack. The cakes should feel tender but sturdy.
- Prepare Your Buttercream Canvas:
- While cakes cool completely (this takes about an hour, so don't rush), make your frosting. Beat softened butter until it's pale and creamy, about 2 minutes. Gradually add powdered sugar, a handful at a time, beating between additions. Add vanilla and salt, then milk, one tablespoon at a time, until you reach that perfect spreadable consistency—thick enough to hold shape but soft enough to spread without tearing the cake.
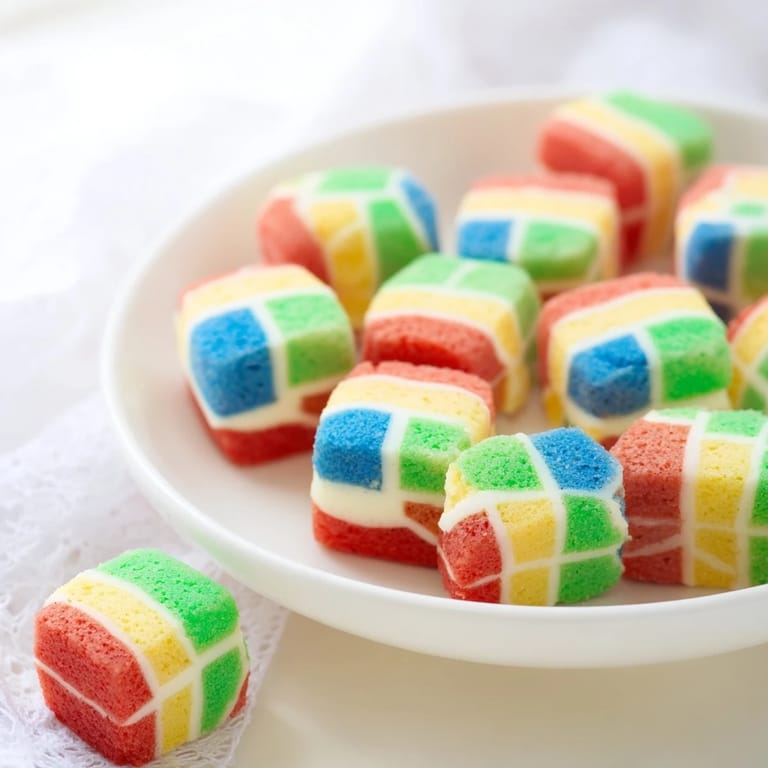
- Cut and Arrange Your Patchwork:
- Once cakes are completely cool, trim the edges straight using a serrated knife. This creates clean, professional edges for your squares. Then slice each cake into uniform 3 x 3 cm squares. You're creating a mosaic here, so consistency matters. Arrange these colored squares on a large serving tray or cake board, alternating colors so they dance together like a real quilt pattern. Use a thin layer of buttercream between each square to 'glue' them together—this is your adhesive and flavor builder.
- Build Your Layers and Frost:
- Keep building, layer by layer, alternating your color arrangement. Once you've built your patchwork structure as tall as you'd like, frost the entire exterior with a thin layer of buttercream, smoothing as you go. If you want to enhance the quilted look further, pipe buttercream lines along the seams where colors meet. This final touch turns it from beautiful to unforgettable.
- Chill and Serve:
- Refrigerate for 30 minutes before slicing. This brief chill firms everything up, making clean slices possible. When you cut through, you'll see the beautiful color pattern from the inside—that moment of reveal is pure magic.
 Save to Pinterest
 There's a moment when you place the last colored square, step back, and see this beautiful patchwork cake come together that feels like art. My daughter once said it looked like 'rainbow quilts you can eat,' and that's exactly what it is—a dessert that brings joy not just through taste, but through beauty and the story behind it.
The Gentle Science of Colored Cakes
When you divide one batter into five colored parts, you're relying on something beautiful: consistency. Each colored cake will bake the same way because they're made from the exact same base. The food coloring doesn't change the chemistry—it only changes how your eyes see the cake. This is why precision in measuring and mixing your base batter matters so much. Once you understand that principle, you realize that baking colored cakes is no harder than baking one; it's just baking one batter five times over. That realization transforms this recipe from intimidating to absolutely achievable.
Creating the Perfect Patchwork Pattern
The arrangement of your squares is where your personal creativity shines. There's no single 'correct' pattern—a true quilt celebrates color and randomness in equal measure. Some people arrange their squares in perfect alternating rows. Others create a more organic, quilted feel by placing colors intuitively. I've learned that the best pattern is the one that makes you happy when you look at it. Stand back between layers and see if the colors are speaking to you. If not, rearrange. Your cake, your vision.
Beyond the Basic Recipe
Once you've mastered the foundation, this cake becomes your canvas for creativity. A touch of lemon zest in the batter gives brightness; almond extract brings warmth and sophistication. Some bakers add a pinch of cardamom for subtle spice. Others have paired it with dark chocolate buttercream or cream cheese frosting. Fresh berries between layers add tartness that balances the sweetness. Each variation tells a new story, and each one is just as beautiful as the last.
- Citrus zest transforms the flavor profile without adding wetness to your batter
- Pairing with fresh whipped cream or berries on the side lets each element shine individually
- Gluten-free versions work beautifully if you use a quality 1:1 blend and measure carefully
 Save to Pinterest
 This cake isn't just about impressing people at the table—it's about the meditation of baking something beautiful, something that takes time and intention. Every time you make it, you'll get a little better, a little faster, and a little more confident in your ability to create something that's both visually stunning and genuinely delicious.
Recipe FAQs
- → How do I achieve the vibrant colors in the sponge?
Use gel food coloring to tint the batter in separate bowls before baking; gels provide vivid hues without altering the batter's consistency.
- → Can I prepare the cake ahead of time?
Yes, bake the colored sponges in advance and assemble just before serving to maintain freshness and vibrant appearance.
- → What is the best way to cut the sponge into uniform squares?
Trim edges first for clean sides, then use a serrated knife to carefully slice the sponge into even 3x3 cm squares.
- → How should the cake be stored once assembled?
Keep the assembled cake refrigerated and covered to maintain buttercream texture and prevent drying out.
- → Are there suggestions for flavor variations?
Add citrus zest or almond extract to the sponge batter to introduce subtle complementary flavors.