 Save to Pinterest
 I'll never forget the holiday party where my grandmother brought out her cheese board, and instead of arranging it the usual way, she had cut thin triangles of Gouda and arranged them like a forest of little Christmas trees around the edge. Everyone gathered around it, mesmerized not just by how beautiful it looked, but by how she'd turned something as simple as sliced cheese into a celebration. That moment taught me that the most memorable dishes aren't always complicated—sometimes they're about seeing the magic in simple ingredients and presenting them with a little intentional creativity.
I remember my sister's face when she walked into the kitchen during a holiday gathering and saw the Tannenbaum border I'd just finished. She actually gasped, then laughed because she realized how simple it really was once you knew the trick. That's when it hit me—this isn't just about food, it's about creating those little moments where people feel genuinely delighted by the thoughtfulness of presentation.
Ingredients
- Semi-firm cheese (Gouda, Edam, or Emmental), 250 g, well chilled: The key here is keeping your cheese cold before slicing—it makes a world of difference in getting clean, crisp triangular cuts. Semi-firm cheese is perfect because it's sturdy enough to hold its shape but thin enough to slice without crumbling. I learned the hard way that room temperature cheese tears instead of slices, so make sure it comes straight from the fridge.
- Small green seedless grapes, 150 g, washed and thoroughly dried: Those little green grapes do the heavy lifting visually, filling the gaps between cheese triangles and completing the pine tree effect. Pat them dry before you use them—any moisture makes them slip around on the board, and you want them nestled securely between your cheese pieces.
Tired of Takeout? 🥡
Get 10 meals you can make faster than delivery arrives. Seriously.
One email. No spam. Unsubscribe anytime.
Instructions
- Prepare your cheese with intention:
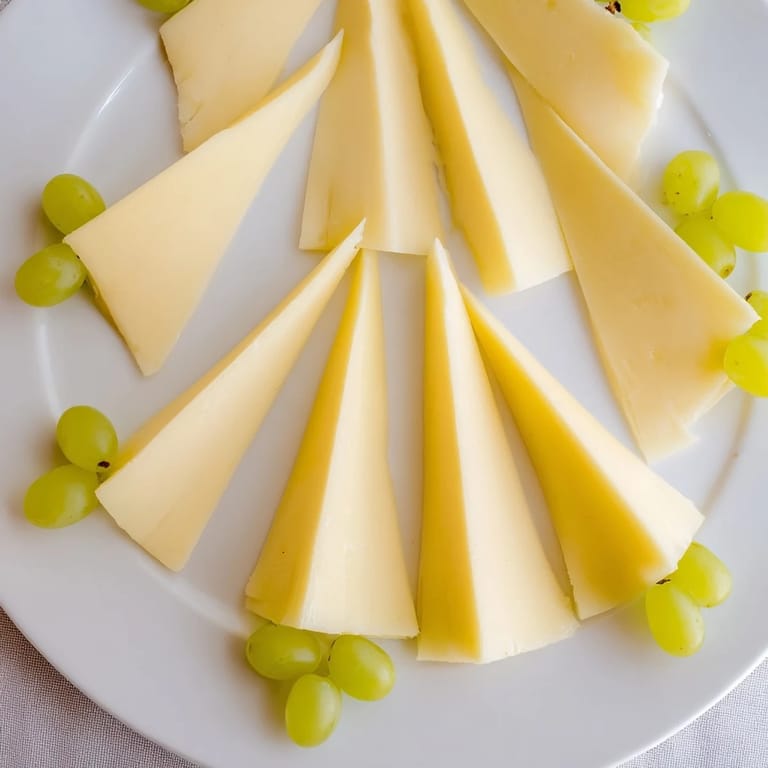
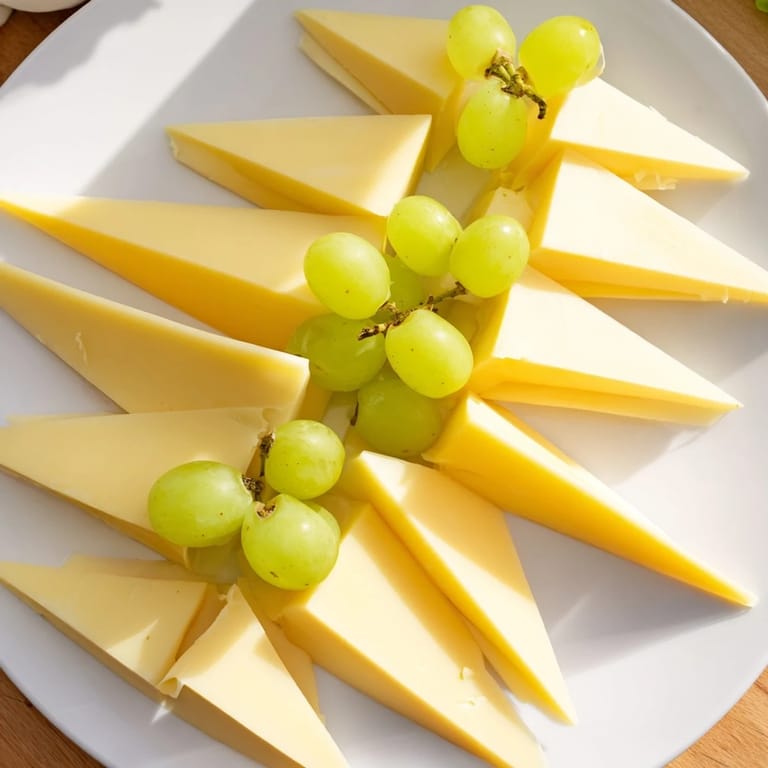
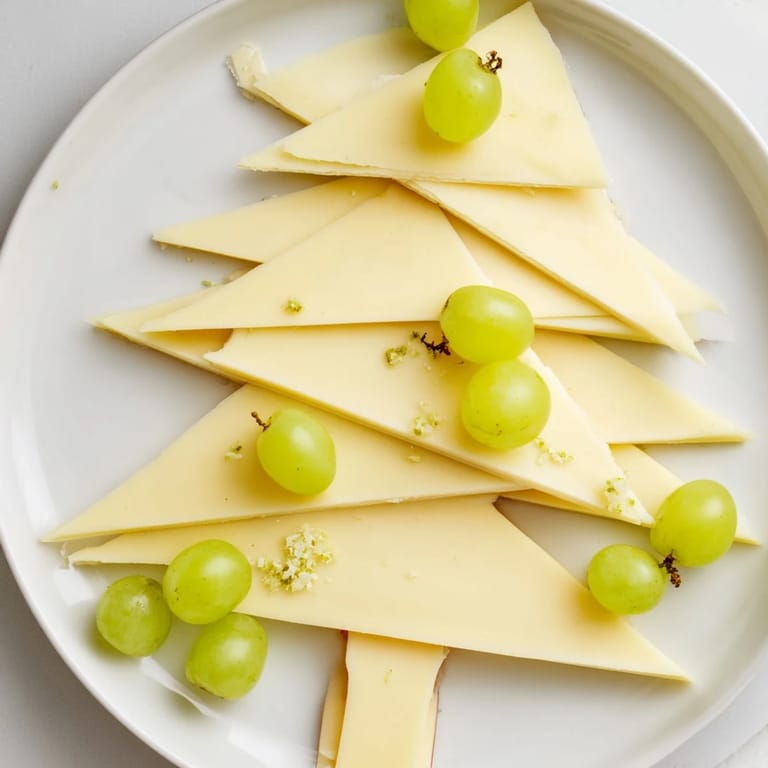
- Take your chilled cheese block and lay it on a cutting board. Using a sharp chef's knife, cut thin triangular pieces about 5 to 6 centimeters long, with a base of roughly 1 centimeter. Think of pine tree silhouettes as you cut—pointed at the top, wider at the bottom. This is where patience pays off; let the knife do the work rather than forcing it through the cheese. You'll develop a rhythm pretty quickly.
- Create the border foundation:
- Take your serving board or platter and imagine the four edges as your gallery. Starting at one corner, arrange your cheese triangles with the points facing outward, like little trees standing in a row. Space them close enough that they create a continuous line but leave just enough room to nestle grapes between them. Stand back and look at it from above—you're building a frame that should feel balanced and intentional.
- Fill with green grapes for the magic moment:
- Now comes the part where it all comes together. Take your dried grapes and gently press them into the spaces between and around the cheese triangles. You're creating the illusion of a little forest garden—the grapes represent bushes or ground cover beneath the trees. Fill every gap you can see; the more densely packed it is, the more cohesive and festive the border becomes.
- Complete the festive frame:
- Continue working your way around all four edges of your board until the entire border is complete. Step back and admire what you've created. The white and pale yellow cheese against the bright green grapes should create a truly festive frame that's unmistakably holiday-inspired.
- Fill the center with your celebration:
- Now the board is ready for its supporting cast. Add your favorite cheeses, cured meats, crackers, nuts, dried fruit, or fresh herbs to the center. The Tannenbaum border does its job—it frames and elevates whatever else you choose to put there, turning a simple cheese board into an edible work of art.
 Save to Pinterest
 There's a particular joy in watching people's eyes light up when they realize the beautiful forest framing your cheese board isn't some elaborate construction—it's just cheese and grapes arranged with a little bit of intention. It's a reminder that hospitality doesn't always mean complexity; sometimes it's about noticing the potential in simple things and presenting them with care.
Bringing Color and Dimension to Your Board
While the classic green grape and pale cheese combination is stunning on its own, I've discovered that adding little pops of color completely transforms the visual impact. A few jewel-toned pomegranate seeds tucked between the triangles catch the light beautifully, or a careful placement of red grapes creates a natural gradient that feels seasonal without looking overdone. The key is restraint—you're adding accents, not overwhelming the composition. I once alternated red and green grapes for a candy cane effect, and while it was playful, the classic all-green version has always felt more elegant to me.
The Art of Cheese Selection and Presentation
One of the things I love most about this recipe is how it works with almost any semi-firm cheese you have on hand. Gouda brings a subtle sweetness, Edam is mild and approachable, and Emmental has those little holes that make each slice feel special. Beyond the border itself, consider how the cheeses you choose for the center of the board will complement these slices. I've learned that having variety—a creamy brie, a sharp cheddar, maybe a funky blue cheese—makes the board more interesting and gives guests options. The Tannenbaum border is your frame, but the entire composition tells the story of your holiday celebration.
Setting the Perfect Table for Holiday Gatherings
This cheese board border works beautifully as the centerpiece of a holiday spread, but the real magic happens when you think about what surrounds it. I love nestling fresh rosemary sprigs into the gaps between triangles—they echo the pine tree theme and add an herbal aroma that makes the whole board feel more intentional. Pair it with holiday-themed crackers in festive shapes, maybe some spiced nuts or candied citrus peel. The board becomes more than just food—it becomes a gathering point, a conversation starter, a small edible art installation that says you cared enough to make something beautiful.
- Consider the height and texture of everything on your board to create visual interest and make it easy for guests to access what they want.
- Chill your serving board in the freezer for 15 minutes before assembling if your kitchen is warm—it keeps everything fresher longer and the cheese slices maintain their shape better.
- Assemble the border no more than an hour before serving to keep everything looking crisp and fresh.
 Save to Pinterest
 Every time I make a Tannenbaum border, I'm reminded that the best dishes are often the ones that feel personal and intentional rather than complicated. This little cheese board border has a way of turning an ordinary gathering into something special, and that's really what cooking is all about.
Recipe FAQs
- → What type of cheese works best for the border?
Semi-firm cheeses like Gouda, Edam, or Emmental are ideal as they slice well into thin, triangular shapes that resemble pine trees.
- → How should the cheese be sliced for the border?
Slice the cheese into thin triangles about 5–6 cm long and 1 cm wide at the base to create a stylized pine tree effect.
- → Can I use different fruits besides green grapes?
Yes, red grapes or pomegranate seeds can be alternated to add vibrant color contrasts along with the green grapes.
- → How do I arrange the grapes with the cheese?
Nestle small green grapes between and around the cheese triangles to fill gaps and emphasize the pine tree border effect.
- → Are there any tips to enhance the pine tree look?
Decorate with fresh rosemary sprigs to mimic pine needles, adding texture and festive aroma to the border.
- → Does this border require cooking?
No cooking is needed; preparation involves simple slicing and arranging, making it quick and easy to assemble.