 Save to Pinterest
 The first time I encountered hojicha was in a quiet tea shop on a rainy afternoon, and I was struck by how it tasted like autumn itself—earthy, toasted, almost smoky. Years later, I found myself staring at a slice of white chocolate cake, wondering what would happen if I married that roasted tea with molten chocolate, and this lava cake became the answer. There's something magical about watching the hojicha ganache spill across a plate, that moment when dessert becomes a small theater of warmth and flavor.
I made this for someone who thought they didn't like white chocolate, and watching their expression shift as the ganache broke open was worth every careful minute of preparation. They asked for the recipe before they'd finished their last bite, and I knew then that this cake had something special, something that transcended the usual dessert pleasantries.
Ingredients
- White chocolate: Choose quality white chocolate with real cocoa butter, not waxy compound chocolate, or the ganache will break when you fold it into the warm batter.
- Hojicha powder: This roasted green tea is the soul of the cake; you can find it at Japanese markets or online, and it's worth seeking out rather than settling for regular matcha.
- Heavy cream: Use full-fat cream for the ganache; anything less won't emulsify properly with the chocolate.
- Unsalted butter: Room temperature butter incorporates smoothly into the ganache, creating that silky texture that flows.
- Eggs: Room temperature eggs whisk to a fuller volume, creating a lighter, more delicate cake structure.
- All-purpose flour: Sift it to avoid lumps; a heavy hand here will make the cake dense and disappointing.
Tired of Takeout? 🥡
Get 10 meals you can make faster than delivery arrives. Seriously.
One email. No spam. Unsubscribe anytime.
Instructions
- Wake up the hojicha:
- Combine chopped white chocolate with hojicha powder in a small bowl, letting the powder bloom slightly as you stir. Heat cream until you see wisps of steam rising, then pour it over the chocolate and wait a full minute before stirring—this pause lets everything soften and meld together.
- Create the ganache centers:
- Stir until the mixture is silky, then add cool butter to finish it. The ganache should be spreadable but firm; refrigerate for about 30 minutes, then roll into balls that fit neatly in your palm.
- Prepare your vessels:
- Butter your ramekins generously and dust with cocoa powder, tapping out the excess so the coating stays even. This prevents sticking and adds a whisper of flavor to each bite.
- Melt and cool the chocolate:
- Set a heatproof bowl over barely simmering water—the bowl shouldn't touch the water—and let the white chocolate and butter melt slowly, stirring occasionally. Patience here prevents graininess.
- Whisk your eggs into clouds:
- Combine eggs, egg yolk, and sugar, then whisk vigorously until the mixture is pale and thick enough that ribbons fall from your whisk. This takes about 3 to 4 minutes and creates the airy structure that makes lava cakes light.
- Fold gently but decisively:
- Pour the cooled chocolate into the eggs, folding with a spatula using broad, gentle strokes. Then sift flour and salt over the top and fold again until you can't see any streaks of flour.
- Assemble with intention:
- Spoon batter into each ramekin until it's about one-third full, nestle a ganache ball in the center, then cover with more batter until nearly full. The batter should completely encase the ganache or it'll escape during baking.
- Bake to the moment:
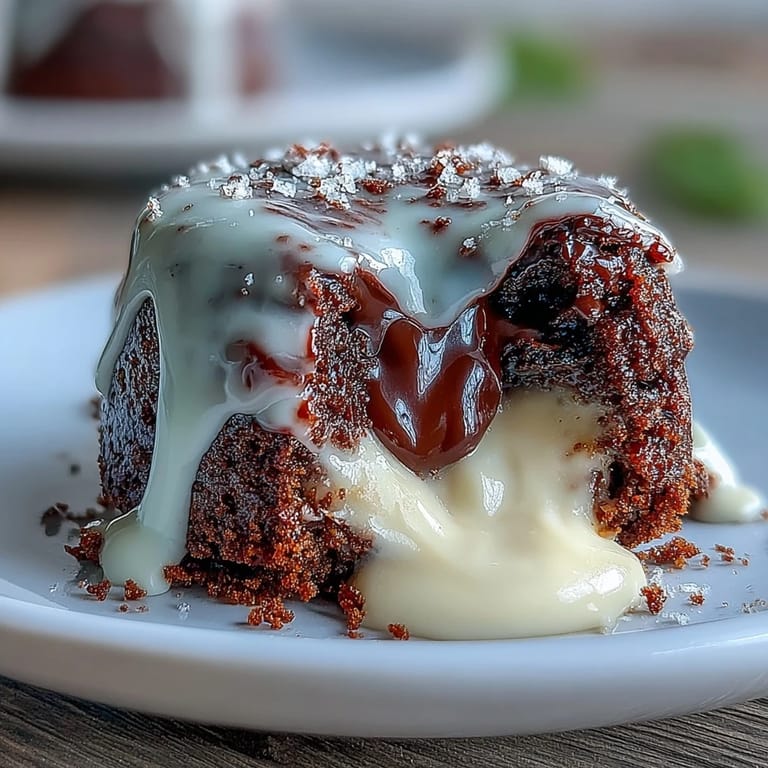
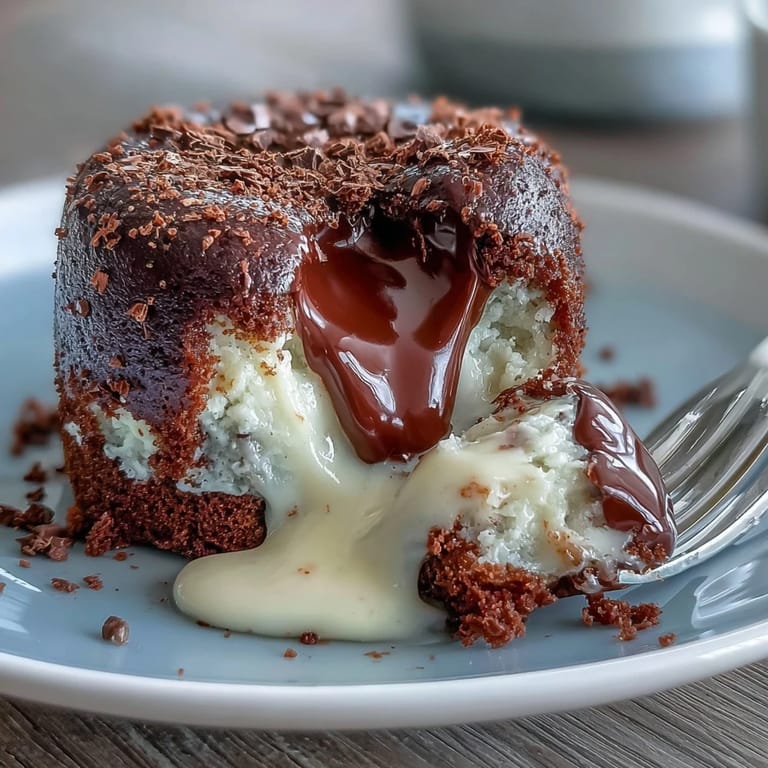
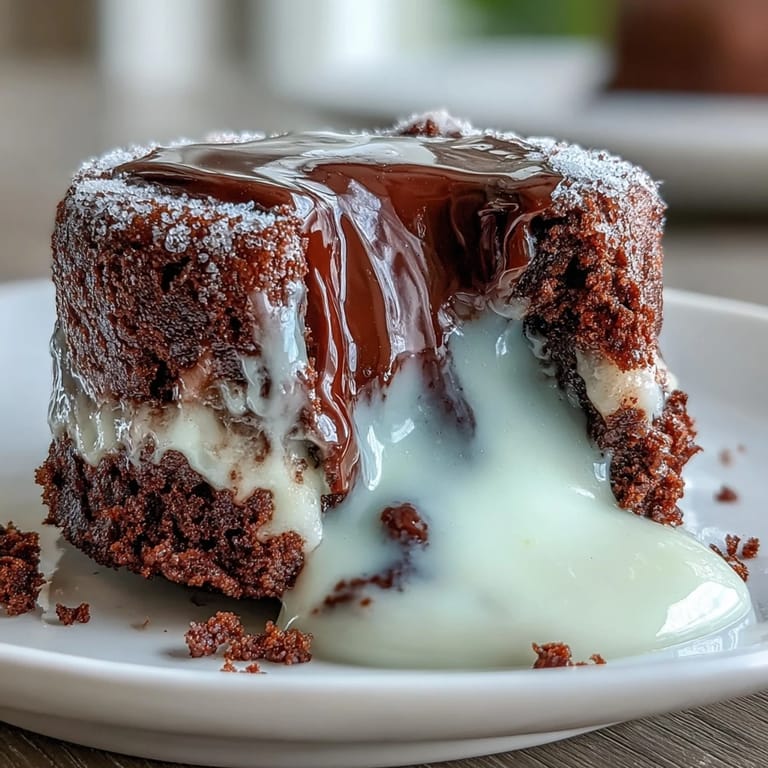
- At 200°C, watch carefully around the 11-minute mark; the edges should look set and slightly pulled away from the ramekin, but the centers should jiggle when you gently shake the pan. This is the difference between a lava cake and a regular cake.
- Invert with confidence:
- After a brief rest, run a thin knife around each edge and invert onto a plate in one smooth motion. Serve immediately while everything is still warm and the ganache is at its most luxurious.
 Save to Pinterest
 There was a quiet moment after everyone tasted this cake when no one spoke, just nodded slowly, and that silence said everything about why food matters. It transformed an ordinary dinner into something I still think about.
The Secret of the Hojicha
Hojicha isn't like matcha; it's roasted rather than stone-ground, which gives it a deeper, almost nutty quality that feels sophisticated without being pretentious. The roasting process mellows the caffeine and sharpens the flavor profile, making it pair beautifully with the sweetness of white chocolate instead of competing with it. When you taste it in this cake, you're tasting the result of ancient tea preparation methods meeting modern dessert sensibilities, and that fusion is exactly what makes this dish feel special.
Timing and Temperature Precision
This cake lives and dies by exact timing, and that's not meant to intimidate you—it's meant to empower you. A preheated oven matters because you want the exterior to set quickly while the interior stays molten. If your oven runs hot or cold, adjust by a degree or two, and always bake with the door closed; that peek you're tempted to take will drop the temperature and cost you those precious seconds.
Make It Your Own
Once you've mastered the basic structure, there's room to play: swap hojicha for matcha, add a whisper of cardamom to the ganache, or serve it with a scoop of miso caramel ice cream instead of vanilla. The architecture stays the same, but the flavor journey becomes yours alone. This flexibility is what transforms a recipe from instructions into a creative canvas.
- Prepare the ganache the morning of and keep it chilled; assembled cakes can sit in the fridge for up to 4 hours before baking, though add a minute or two to the bake time.
- If you don't have ramekins, oven-safe coffee cups or small mason jars work just as well and add an unexpected charm.
- Dust with powdered sugar or a sprinkle of sea salt just before serving to add texture and visual drama to the plate.
 Save to Pinterest
 This cake is proof that the best desserts aren't about complexity—they're about intention and a single perfect moment of warmth and flavor. Make it when you want to remind someone (or yourself) that small efforts create big magic.
Recipe FAQs
- → What makes hojicha special in this dessert?
Hojicha is roasted Japanese green tea with earthy, nutty notes and lower caffeine than other teas. Its natural toasty flavor pairs exceptionally well with white chocolate, creating a sophisticated balance that prevents the dessert from becoming overly sweet.
- → How do I know when the cakes are done baking?
The edges should appear set and slightly pulled away from the ramekin sides, while the center remains soft and jiggly when gently shaken. This 11-13 minute bake time at 200°C creates the perfect lava consistency—firm exterior with flowing ganache inside.
- → Can I make these ahead of time?
Yes! You can assemble the cakes in ramekins and refrigerate for up to 4 hours before baking. If baking from chilled, add 1-2 minutes to the baking time. The ganache centers can also be prepared and rolled into balls a day ahead.
- → What if I can't find hojicha powder?
Matcha powder makes an excellent substitute for a vibrant green tea version. Alternatively, try other tea powders like Earl Grey or chai for unique flavor variations. Just keep in mind that the flavor profile will change accordingly.
- → Why must these be served immediately?
The signature lava effect only works when the cakes are warm from the oven. The ganache center needs to be molten to flow beautifully when cut. As they cool, the center solidifies and becomes more like a traditional filled cake, though still delicious.
- → What size ramekins work best?
Ramekins with 6-8 cm diameter are ideal—typically holding 4-6 ounces each. This size allows the batter to bake evenly while ensuring the ganache center stays molten. Four individual cakes yield perfect portions for this rich dessert.