 Save to Pinterest
 There was this quiet afternoon when my neighbor pressed a small tin of hojicha into my hands, insisting I'd never tasted tea quite like it. She was right—that first sip was like autumn decided to become smooth and creamy, with notes of caramel and toasted grain that didn't fade. I spent the next week wondering if I could capture that feeling in ice cream, and when I finally churned my first batch, the kitchen filled with this warm, nutty perfume that made everything feel less ordinary. This recipe became my answer to that gift, a way to turn something borrowed and appreciated into something I could share back.
I made this for a small dinner party last spring, and someone asked for the recipe before they'd finished their first bite. What struck me wasn't just the compliment, but how the conversation shifted—suddenly everyone was talking about tea they'd tried, flavors they'd chased, moments they'd tasted something that changed their mind about an ingredient they thought they knew.
Ingredients
- Heavy cream (2 cups): This is your foundation for richness and that silky mouthfeel that makes ice cream feel luxurious rather than icy.
- Whole milk (1 cup): The milk keeps things from being too dense while letting the hojicha flavor shine without competition.
- Hojicha loose leaf tea (3 tbsp): Loose leaf is worth seeking out because the leaves are larger and you can really see and taste the toasted depth, though bags work fine in a pinch.
- Egg yolks (4 large): These create that custard base that gives proper ice cream its structure and keeps it creamy even when frozen.
- Granulated sugar (2/3 cup): The sugar dissolves into the custard and also helps prevent ice crystals from forming during freezing.
- Fine sea salt (pinch): A tiny pinch amplifies all the other flavors and keeps the sweetness from feeling one-dimensional.
Tired of Takeout? 🥡
Get 10 meals you can make faster than delivery arrives. Seriously.
One email. No spam. Unsubscribe anytime.
Instructions
- Heat your cream and milk:
- Pour the heavy cream and whole milk into a saucepan and set it over medium heat. You're looking for steam rising and tiny bubbles forming around the edges, but not a rolling boil—too much heat and you'll scald the dairy, which tastes slightly burnt and ruins everything.
- Steep the hojicha:
- Add your loose leaf hojicha to the hot milk, reduce the heat to low, cover the pan, and let it sit undisturbed for 10 minutes. This is the moment when your kitchen starts smelling like a tea house, warm and slightly toasted and completely inviting.
- Strain and extract every drop:
- Pour the mixture through a fine sieve, using the back of a spoon to gently press the tea leaves so you get every last bit of flavor and color into the milk. Don't rush this—those pressed leaves will release the deepest, most concentrated hojicha essence.
- Prepare your egg yolk mixture:
- In a separate bowl, whisk together the egg yolks, sugar, and salt until the mixture goes pale and slightly thickened, about 2 minutes of steady whisking. This step is important because it aerates the yolks and helps them emulsify smoothly with the hot liquid.
- Temper the yolks carefully:
- Slowly pour about 1 cup of the warm hojicha mixture into the egg yolks while whisking constantly, as if you're bringing them into the warmth gradually rather than shocking them. This tempering step is what prevents scrambled eggs in your ice cream and is absolutely worth doing slowly and deliberately.
- Combine everything:
- Pour the yolk mixture back into the saucepan with the remaining hojicha milk, whisking to blend smoothly. Now you have one united, glossy mixture ready to become custard.
- Cook the custard to perfect thickness:
- Set the heat to low and stir constantly with a wooden spoon, scraping the bottom and sides so nothing sticks or cooks too fast. You're aiming for about 170–175°F (77–80°C), which you can feel when the mixture coats the back of the spoon and you can draw a line through it with your finger.
- Strain again for absolute smoothness:
- Pour the custard into a clean bowl through a fine sieve to catch any bits of cooked egg, then let it cool to room temperature. Once cooled, cover and refrigerate for at least 4 hours until it's completely chilled—this resting time matters because cold custard churns better and freezes more smoothly.
- Churn into frozen magic:
- Pour your chilled custard into your ice cream maker and follow the manufacturer's instructions, which usually takes 20–30 minutes. You'll watch it go from liquid to soft-serve consistency right before your eyes, and the hojicha flavor will seem to deepen as the cold takes hold.
- Freeze until firm:
- Transfer the churned ice cream to an airtight freezer container and freeze for at least 2 hours more until it's scoopable and firm. Any longer is fine—properly made ice cream keeps beautifully for a few weeks if you can resist eating it faster than that.
 Save to Pinterest
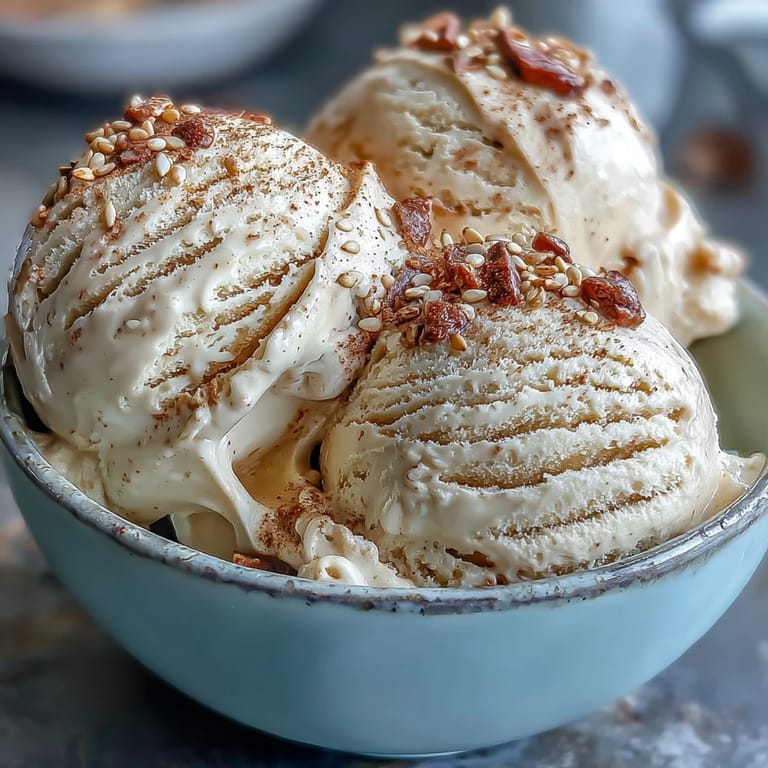
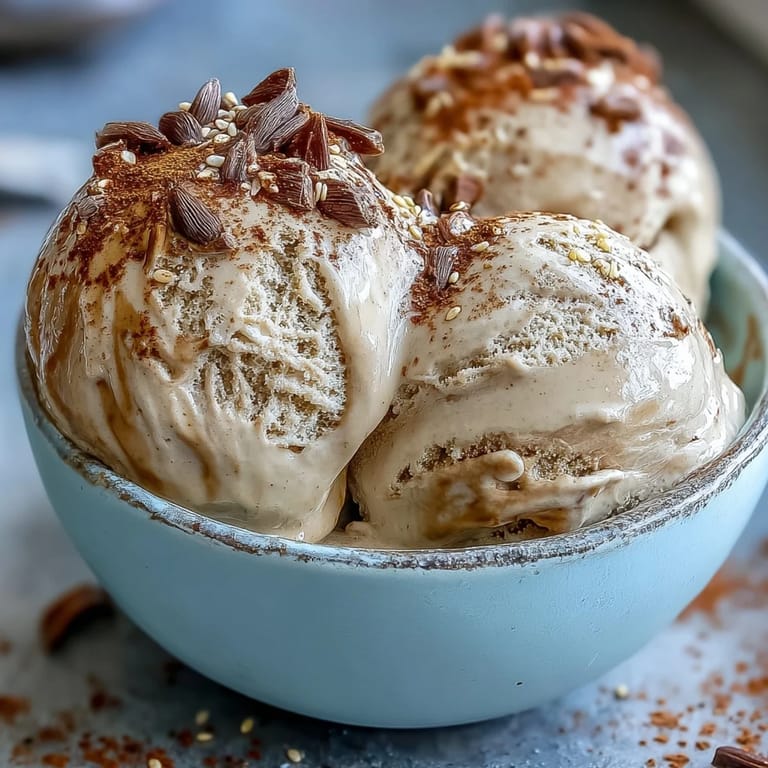
 There's something almost meditative about watching hojicha ice cream scoop out clean and smooth, that deep brown catching the light like it's been toasted all over again. It's become my go-to answer when someone asks what Japanese dessert I actually understand how to make.
Customizing Your Hojicha Base
Once you understand how this custard works, you can play with it endlessly. I've made it with a touch of vanilla extract added after chilling, which sounds wrong but somehow deepens the whole experience. Some people swirl in a bit of sweetened condensed milk before the final freeze, which creates these pockets of silky caramel throughout. You could also infuse the cream with something like cardamom or a whisper of sesame oil if you want to push the Japanese flavor profile even further.
Serving Ideas That Actually Work
The beauty of hojicha ice cream is that it doesn't need much, but when you do pair it, go thoughtful. Fresh strawberries or sliced peaches sit next to it like they were always meant to be there, offering brightness against the toasted, earthy sweetness. Mochi is the obvious choice if you want to stay in Japanese territory, and it's legitimately perfect—the chewy texture and neutral flavor make hojicha taste even more complex. I've also served it with a simple shortbread or even a slice of matcha cheesecake, and both times the hojicha became the bridge that made everything make sense together.
Storage and Making Ahead
This ice cream actually improves when you make it a day or two ahead because the flavors settle and deepen slightly in the freezer. Keep it in an airtight container to prevent freezer burn and ice crystal formation, and let it sit on the counter for about 5 minutes before scooping if it's been frozen more than a few hours. It keeps beautifully for up to three weeks, which means you can make it on a weekend and have elegant dessert waiting whenever you need it.
- If your ice cream freezes too hard to scoop, let it warm up for a few minutes on the counter rather than microwaving, which can create weird texture issues.
- A damp spoon makes scooping infinitely easier and prevents ice cream from sticking and tearing.
- Any leftover hojicha tea can be chilled and served as a cold tea on its own—never waste good flavor.
 Save to Pinterest
 There's a reason hojicha ice cream feels special even though it's just cream, milk, eggs, and tea—it tastes like someone understood something about flavor and took the time to do it right. Once you've made it, you'll understand too.
Recipe FAQs
- → What makes hojicha different from regular green tea?
Hojicha is roasted green tea that undergoes high-heat processing, giving it a reddish-brown color and distinctive nutty, caramel-like flavor profile. Unlike steamed green teas, hojicha has lower caffeine content and reduced bitterness, making it ideal for infusing into dairy bases.
- → Can I make this without an ice cream maker?
Yes, though the texture will be slightly different. Pour the chilled custard into a shallow container and freeze for 2-3 hours, stirring vigorously every 30 minutes to break up ice crystals until firm. This manual method requires more effort but yields enjoyable results.
- → How long does the finished dessert keep in the freezer?
Properly stored in an airtight container, it will maintain optimal quality for 1-2 weeks. For the best texture and flavor, consume within the first week. Ice crystals may develop over time, but a quick stir before serving helps restore creaminess.
- → What's the best way to strain the tea leaves?
Use a fine-mesh sieve and press firmly with a spoon or spatula to extract maximum flavor. For even finer straining, line the sieve with cheesecloth. This step ensures no leaf particles remain while capturing all the aromatic oils and infused taste.
- → Can I substitute the heavy cream with lighter alternatives?
While you can use half-and-half or a milk-coconut cream blend, the texture will be less rich and may become icy. Heavy cream provides the fat content necessary for a smooth mouthfeel. If substituting, expect a lighter result with slightly faster melting.
- → Why is tempering the eggs important?
Tempering gradually warms the egg yolks to prevent scrambling when combining with hot liquid. This technique creates a smooth, cohesive custard. Slowly whisking about 1 cup of warm hojicha milk into the yolks before returning everything to the saucepan ensures safe, even cooking.